

Forge of Fury – Glitterhame – Main
Slab


Virtual Tabletop Journey all Demongund patrons presents the second of the iconic Tales From the Yawning Portal – Forge of Fury boards: The Glitterhame, recreated for use in TaleSpire! With only a few quick copy/pastes, your adventurers can begin their descent into mushroom forests caverns above the ancient dwarven home of clan Durgeddin!
This book enhances the original Forge of Fury (3rd edition available at DMsGuild, 5th edition available at DnDBeyond.com), which you will still need.
To complete this board, assemble..
- Glitterhame – Main (this slab)
- Glitterhame – Warrens (paste on the B marker)
- Glitterhame – Tunnel (paste on the A marker)
To combine this slab with the Sinkhole slab…
- Copy the Sinkhole slab to your clipboard
- Open the Glitterhame board and set your build plane to the top of the ‘sinkhole’ area
(underneath the waterfall) - Paste & position the Sinkhole slab, align the red tiles in the NW side of the Sinkhole slab
(circular stairwell) with the circular part of the downward stairs. - Change the height of the Sinkhole if needed.
- Click to place the slab
Please visit the product page at DMsguild.com to Pay What You Want for a full PDF containing alternate room descriptions, assembly instructions and other board information.
This book includes…
- 5 revised room descriptions which accurately reflect rooms visible to players.
- One entirely new room description for the 500 ft. ancient orc siege tunnel!
- Details about the challenges of converting 2D maps to 3D.
- Slab assembly instructions and advice.
If you enjoyed the map, please consider becoming a patron so I can continue to provide high quality maps for the community!

wow!!!! What a amazing work!!!!! You are insane! tks for it!!
Thanks for making this but I’m curious why you split up Glitterhame into three pieces? Is it possible to copy and paste all three slabs into one board? I tried connecting the Glitterhame Main with Glitterhame Warrens but the latter kept being below the Main slab.
The full board is far too large for one slab. Yes, all three pieces connect to form one large one.
Assembly Instructions
1. Set your build plane all the way to the bottom of the board
2. Copy and paste (do not use the Board Import feature) the Main slab
3. Set your build height using the ‘A’ marker. Copy and paste the Warrens slab (it should be
on your cursor). Line up the wall edges in the large room by the river, then left click to place
the slab.
4. Set your build height using the ‘B’ marker. Copy and paste the Tunnel slab (it should be on
your cursor). Line up the tunnel entrance (the one without the portcullis) with the
connecting hallway near the B marker, then left click to place the slab.
— If you set your build height each time, before pasting, everything should be at the correct height. If you have trouble, paste then use CTRL + mouse wheel to shift the height of the slab.
Demongund,
Thanks! Although pasting the Warrens to marker A confused me! Okay, that makes perfect sense now that I know how to adjust the height of the slabs before pasting them down!
I assume the Tunnel is something extra you needed (I was looking in the original adventure map were the “orc tunnel” was.
Thank you and I’ll go to DMsGuild and buy your map as thanks for saving me time making this on my own!
The tunnel is definitely in the module but just as a one-liner in the room 21 description. I could have left it off but it wouldn’t have felt ‘complete’ to me 🙂
—
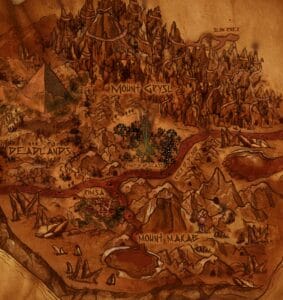
A hundred years ago, the orcs besieging Khundrukar tunneled into the dwarven stronghold. The cavern they emerged in now serves as a guard post and a mustering point for troglodyte raiders.
The tunnel in the northern end of the area runs about 500 feet and opens on the hillside (see the “Orc Tunnel” subsection of “Scout the Area”). The troglodytes use the opening to raid and hunt on the surface.