

Dungeon of Light
Slab
This small dungeon lies hidden beneath a town where the local thieves guild uses it to hide their treasures. Even they do not realize that a secret is hidden away within its treacherous corridors. (Here is the map of the thieves guild, if you want to use it as well)
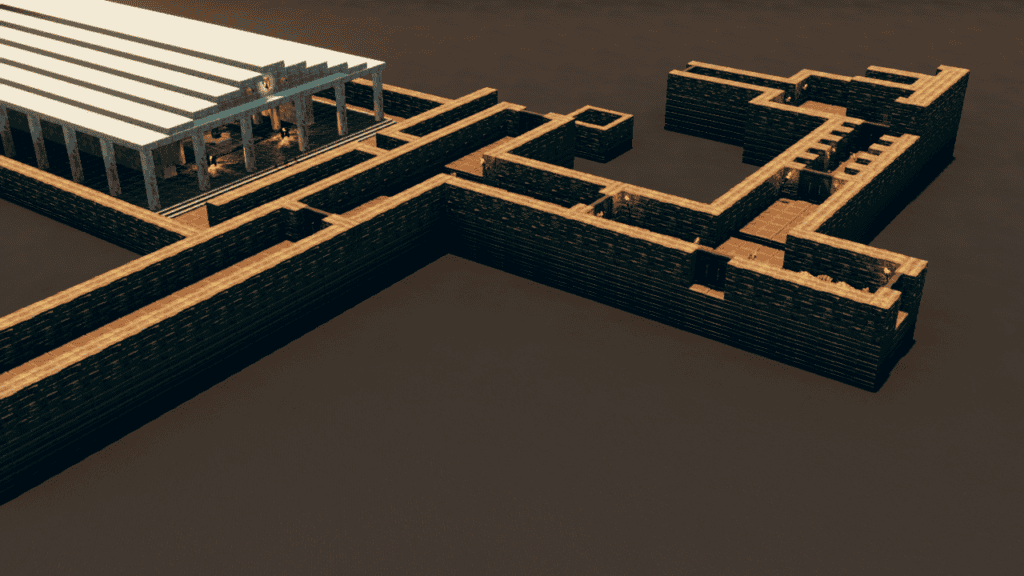
This dungeon is relatively linear but filled with false doors and traps to snag the unwary. While you can feel free to use this as you like, below are the notes I used to run it, which may be helpful. I used hide volumes to hide away each section of the dungeon and prevent the players from figuring out which doors are real and which are false.
Note that this dungeon is meant to be highly deadly and will require the players to think and be cautious if they are going to survive. Folks who rely on rolls to hammer themselves through everything will likely die.
1) Entrance – The characters will come down the stairs to this chamber and are presented with 3 possible doors.
Should they choose the passage straight ahead, attempting to open the door will open a pit trap that runs most of the length of the hall leading to it (remove/hide the 3 tiles leading to the door to reveal the pit). Those standing on the pit when it is triggered receive 1d6 points of falling damage as well as an additional 2d8 points of damage from the spears below. The trapdoor then resets, sealing those who fell in the pit below. A DC 18 intelligence (investigation) check reveals there is a pit trap in the area, but the triggering mechanism is behind the door, making it impossible to disarm without first opening it and triggering the pit trap. A DC 15 wisdom (perception) check reveals a section of the hallway is conspicuously lacking in dust. The only way to open the pit trap (to free anyone sealed in it) is to trigger it by attempting to open the door (perhaps using a rope, for example). There is nothing behind the door other than the trap mechanism, which can be disabled with a DC 10 dexterity (thieves tools) check. Disabling the mechanism makes it impossible to open the pit trap until the mechanism is enabled again.
The door on the right is also trapped. It cannot be opened, because it is a false door that only serves to trigger a trap. A DC 15 wisdom (perception) check reveals tracks in this section, though there is nothing in the area that looks like it would use the tracks. A DC 15 intelligence (investigation) check reveals there is some kind of mechanism built into the torch. When the handle is pulled a heavy stone wall falls into place, sealing this section off from the rest of the chamber. Anyone who is standing in the section it falls must make a DC 15 Dexterity save or be crushed by the slab for 4d8 points of damage. Regardless of the result, they may choose which side of the wall they dive towards (inside or outside). Those sealed inside will find the wall slowly squeezing in (one square per initiative round). A solid stick/pole can be used to slow down the wall and add precious few moments for those stuck inside to think, however the stone wall eventually breaks it and continues moving and ultimately crushing those sealed inside into a bloody paste. The only way to avoid this fate is to extinguish the burning torch, which resets the trap.
The door on the left is safe, though locked. A DC 15 dexterity (thieves tools) check can unlock it. Otherwise extinguishing the torch next to the door also disables the lock for 1 minute before the torch relights and the door locks again.
2) Statue room – This hallway is flanked on each side with small niches, each filled with statue of long forgotten people of the past. The room is safe until someone tries to open the far door. If the pair of torches at the midpoint of the hallway are extinguished, the doors open safely and nothing happens. If the torches remain lit, then anyone who tries to open the door will find it locked (DC 15 and 1 minute to pick). The statues are actually gargoyles (as found in the monster manual, but these ones also have immunity to fire and a 15 ft fire cone attack that deals 3d8 fire damage, DC 13 Dex save for half damage), but they only attack if someone attempts to open the door without first extinguishing the torches. The gargoyles will also attack if any of them are injured in any way.
3) Treasure chamber – The first thing one notices in this room is a spiked pit blocking the way. Falling into it deals 1d6 points of falling damage as well as 2d8 points of piercing damage from the spears below. Luckily, it is only a 5′ wide pit. A simple DC 10 strength (athletics) or dexterity (acrobatics) check will allow anyone to jump across. However, the ledge on the opposite side is actually a trap built on a hinge. If anyone lands on that ledge, it falls downward and revs up a series of spinning blades below that deal 4d6 points of slashing damage. The blades wind down on their own in a minute though if someone is cut by them, they stop naturally due to friction after doing their damage. Extinguishing the torches at the beginning of the chamber locks the ledge in place, allowing safe jumping.
The door straight ahead is another false door. Touching it triggers a Spirit Guardians spell (see spell for details) centered on this intersection. Everyone in the 15′ radius area takes 3d8 points of radiant damage with a DC 13 Wisdom save for half damage. The effect lasts one minute, though touching the false door resets the minute.
The door to the left is also a false door. It does nothing and cannot be opened. However there is a scattering of treasure in the area. The big treasure pile near the door is the thief guild’s secret stash of treasure and contains roughly 50,000 gold coins worth of assorted coinage and gems, studded leather armor (+1 mariner’s armor), and a plain sack (bag of holding). All of this treasure is guarded by 2 mimics posing as chests and 4 mimics posing as piles of coins (as per the monster manual, though with double HP since they’ve been fattened up with meat given them by the thieves guild). The mimics attack anyone who touches them or goes after the treasure without first feeding them some meat. Anyone who feeds them is assumed to be a legitimate guild member and is left alone.
The door to the right is sealed shut unless the torches flanking it are extinguished. The lock is very high quality, requiring a DC 20 to disable otherwise. Anyone who touches the door can feel it is unusually warm to the touch.
4) Lava Room – The first thing one feels upon entering this room is a blast of hot air. It doesn’t take much to find the source: a pit of lava at a T intersection ahead. This pit is completely illusionary and is meant to throw off intruders. Extinguishing the torches next to it causes the illusion to fade, revealing a safe passage as well as a door hidden behind an illusionary wall straight ahead. The hidden door is completely safe to open and leads to the next area.
The door on the left leads to a long hallway coated in oil. Anyone moving more than half their movement speed must make a DC 15 Dexterity save or fall prone. The middle of the hallway is a pivot point. If more weight is on the far side than the near side, the floor will pivot downward, causing everyone to slide down the slippery floor into a chamber containing 3 gelatinous cubes. Everyone who slides down is considered engulfed by one of the cubes (no save). The far door is false and does nothing if anyone attempts to open it.
The door on the right side instantly teleports anyone who touches it to a small, sealed room filled with bones. There is no way out of the room other than teleportation, though if a living creature is in the room when someone touches the door, the two swap places.
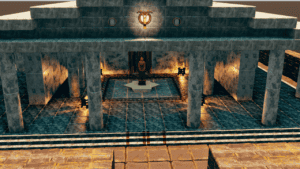
5) Hidden Temple of Light – The hidden doorway reveals stairs leading down to a massive chamber containing the long-lost Temple of Light. The temple is guarded by a stone golem (as per the MM) that activates once anyone climbs the steps to the temple. The golem can be fought, but the temple door is not locked and the golem is under orders to stay within this chamber, but outside of the temple, so it can be avoided. Those who pass a DC 10 dexterity (stealth) check can also sneak into the area without activating the golem, provided they use the columns to sneak around it.
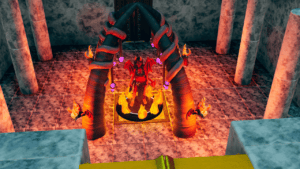
6) Inside the temple (demon room) – The front doors lead to a summoning circle containing a powerful demon named Gonorah the Bloody (a pit fiend, as per the monster manual). Gonorah will talk to anyone who enters the room, offering them wealth (50,000 gold) or power (1 free level in Warlock) in exchange for their souls (or whatever other kind of deal that might be valuable to the characters). Anyone who agrees to such an offer loses ownership of their soul and will become a lemure in Hell that is bound to Gonorah whenever they die. This means they cannot be resurrected by any means that requires their soul to be free and willing to return. Gonorah cannot leave the summoning circle she currently occupies, nor can she provide whatever she promises, unless it is first broken. There are 2 ways to break the circle. The first is for anyone outside to simply cross its threshold. This breaks the magic and Gonorah goes free. The second is to touch the far door without first extinguishing the 4 torches surrounding her summoning circle. If the torches are extinguished, anyone can pass through the far door without hassle. If Gonorah becomes freed, she will slaughter anyone who attacks her or that has refused to make a deal with her. Anyone who has made a deal with her is left alone, provided they remain non-hostile. Once Gonorah has slaughtered everyone in the room that she feels like killing, she returns to Hell.
7) The final room – The final room of the temple is littered with remains of the dead. On either side of the room are massive piles of gold coins. These coins are actually copper coins with an illusion upon them that makes them appear to be gold. They are also cursed. Anyone who willingly takes the gold becomes cursed and must make a DC 15 wisdom save at the start of each of their turns. If they fail, they waste their action that turn doing nothing. This lasts until the target receives a remove curse spell. Each pile of copper is worth about 100 gold all told.
At the far end of the room is an altar, upon which sits a glowing stone.
This is the Water Stone, a powerful artifact that was long ago stolen by members of this temple and sealed here for safe keeping (see below for description). There are a series of lights here. By now the players should have caught on that light is important here and may guess that the way to bypass the danger of this room is to extinguish these torches. They would be wrong. These torches are the only thing keeping them safe right now. Extinguishing them causes the angry spirits of the dead here to awaken and attack all living things in this room. Once the last torch is extinguished, 18 wraiths attack (stats as per the monster manual). Anyone who dies in this room becomes a wraith the round following death.
Once the wraiths are dealt with/avoided all that leaves is the retrieval of the stone itself. Allow the survivors a moment to take the stone and savor the moment of victory. They survived almost certain death to make it here! Once they have pat themselves on the back for their victory, suddenly the temple will begin to rumble as it begins to collapse. Everyone has 20 rounds to escape. During the escape, 1d4 “random” piles of rubble fall from the ceiling. Randomly choose a unique target for each pile, they must make a DC 13 dexterity save or take 3d8 points of damage from the falling rubble. If they fail the save by 4 or more, the target is knocked prone and restrained by the rubble, requiring a DC 15 strength (athletics) check to get themselves out or be pulled out. If someone is helping them, they get advantage on this check. Anyone who is carrying a light source automatically avoids the falling rubble, but don’t make it obvious that this is the case. As far as the players know, the targets are random and anyone not getting hit is simply lucky.
If the characters make it out, then they finally are successfully free of the dungeon. Of course, the noise may have alerted the thieves guild above, but that’s another story…
New Item: Water Stone
Wondrous Item, legendary
A legendary stone of great elemental power, the water stone appears to be a simple chunk of blue sapphire. If left undisturbed for at least 24 hours, the water stone slowly affects all sources of water within a 10-mile radius. Fresh water in the area is pure and clean. Oceans are freed of hazards and fish become abundant.
If someone attunes to it, they gain the following powers while the stone is in their possession:
Cast Create or Destroy Water, Purify Food and Drink, and Fog Cloud at will.
Cast Sleet Storm, Cone of Cold and Control Water 1/day each.
Resistance to acid and cold damage